Delivery systems
GSX Gizmo allows you to create customized alerts by managing different delivery methods, recipients, thresholds, etc.
Once created, the Delivery system has to be associated:
to an alert in the Statuses & Alerts page,
or to an alert in the Robots management page.
Creating a Delivery system
Click this button to open the Add a new delivery system panel.

Choose the desired delivery system type.

Editing a Delivery system
Click this button located in the Delivery system to edit. Then click Edit.
The Delivery system panel opens in edition. You can now change the parameters.
Delivery system types
ServiceNow
GSX Gizmo can integrate directly with ServiceNow and create, update and close incidents directly in ServiceNow Incident table. This allows the IT Teams to directly integrate GSX Gizmo into their processes and take actions to resolve degraded services.
Prerequisites
Activate a ticket management in the Alert description specifying you want to go to ServiceNow.
Basic Authentication must be enabled on ServiceNow instance.
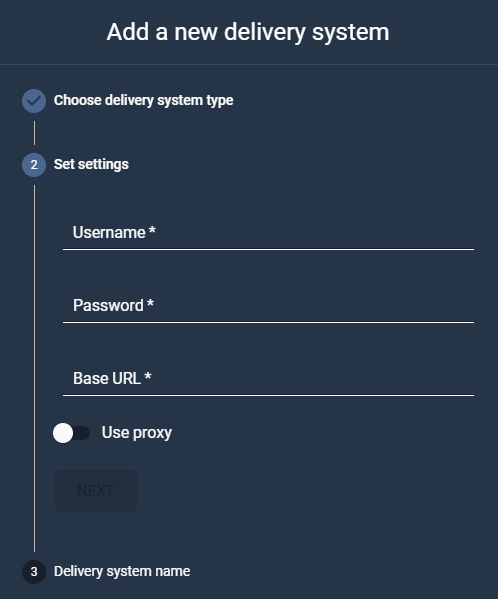
Set settings (fields with * are mandatory)
Username: Login to ServiceNow instance.
Password: Password to ServiceNow instance.
Base Url: Base URL of ServiceNow instance.
Select Use Proxy if needed
Proxy Address: Address of proxy to use.
Proxy Login: Login of proxy to use.
Proxy Password: Password of proxy to use.
Name the Delivery system
Click Add.
The Delivery system is now added in the list.
Webhook with MS Power Automate
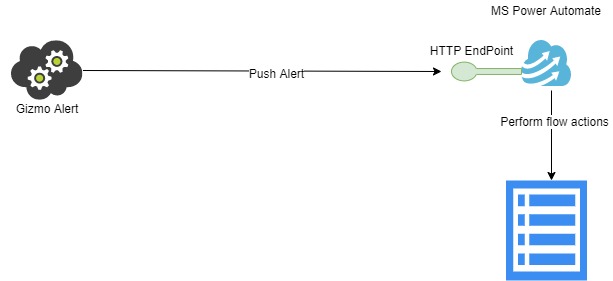
Microsoft Power Automate allows you to create “flows” (short for “workflows”) that are based on trigger events.
In GSX Gizmo, the Alert service sends Alert results to MS Power Automate and once the Alert received, you can use the provided tasks to transform, store or send the Alert.
Prerequisites
You need a valid MS Power Automate premium account.
You need a flow with at least a configured ‘When a HTTP request is received’ task and one other step.
Preliminary Configuration: Create a flow and configure the ‘When a HTTP request is received’ task
Connect to MS Power Automate portal (https://flow.microsoft.com/ )
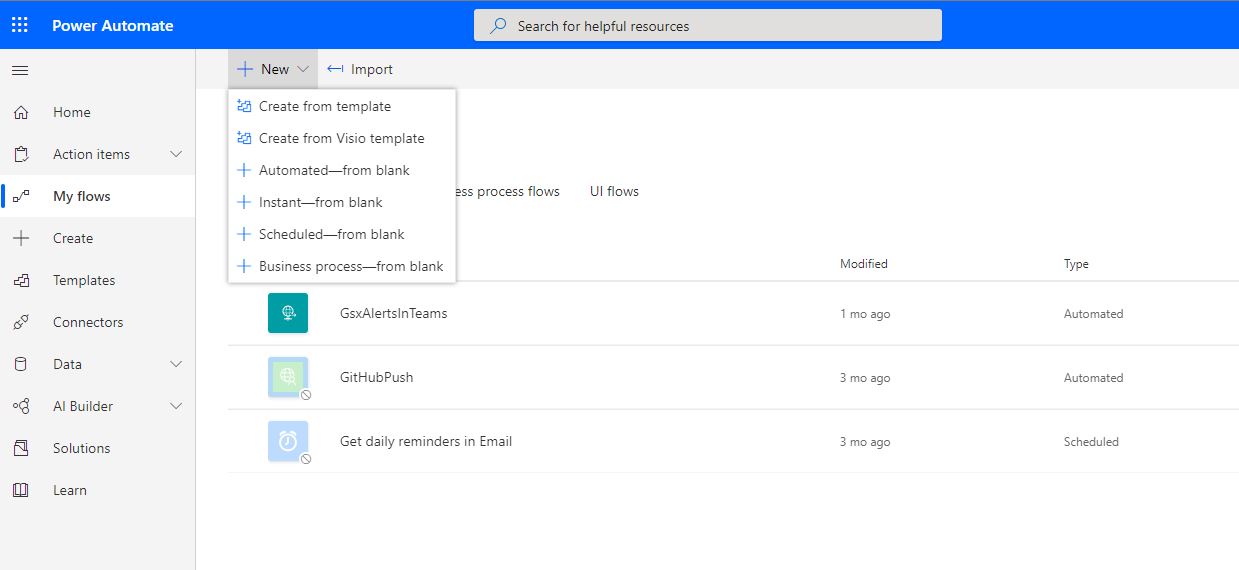
Go to MyFlow > New > Instant from blank
Fill the Flow name and scroll to the ‘When a HTTP request is received’ task.
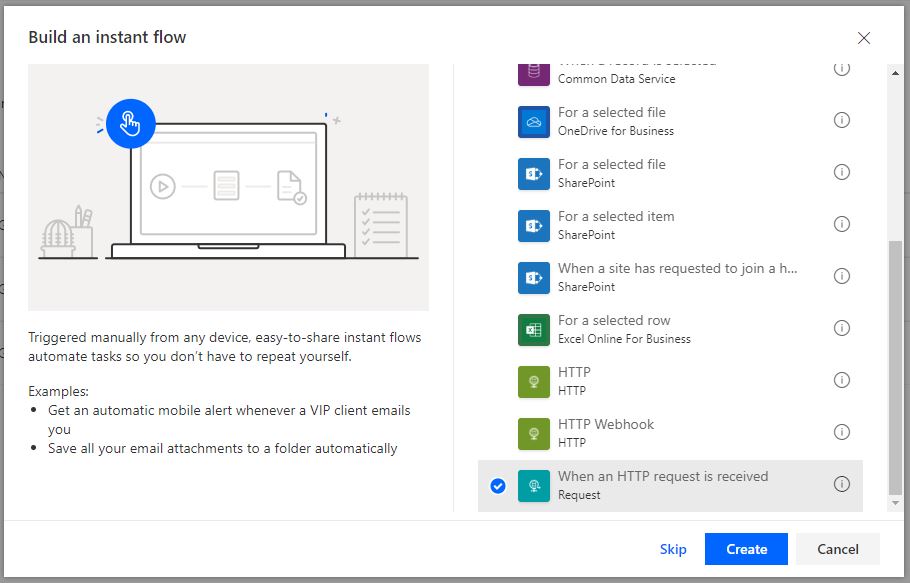
Click the Create button.
Click on the task to configure in the Request Body JSON schema and choose REST Method.
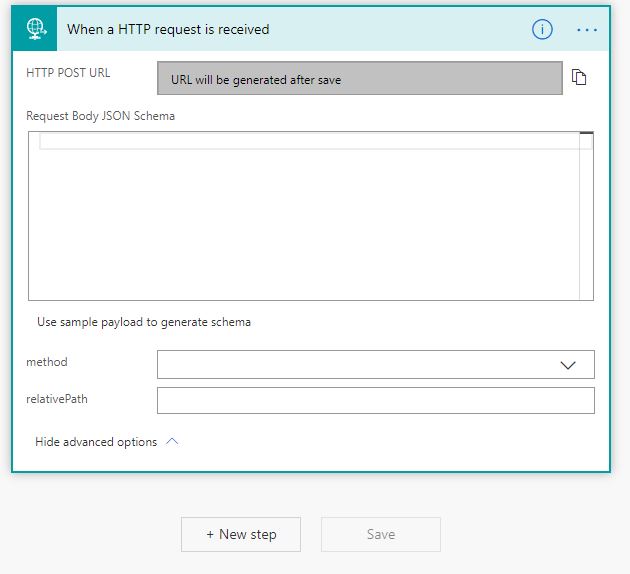
The Request Body JSON schema represents the Alert Result JSON schema sent by the Gizmo Alert (see below).
{
  "type": "object",
  "properties": {
    "AlertGuid": {
      "type": "string"
    },
    "AlertName": {
      "type": "string"
    },
    "Ticket": {
      "type": "object",
      "properties": {
        "TicketId": {
          "type": "integer"
        },
        "CreationDateUTC": {
          "type": "string"
        },
        "Status": {
          "type": "integer"
        },
        "RulePriority": {
          "type": "integer"
        }
      }
    },
    "RuleName": {
      "type": "string"
    },
    "RuleMessage": {
      "type": "string"
    },
    "ComposedStatusResult": {
      "type": "object",
      "properties": {
        "StatusGuid": {
          "type": "string"
        },
        "StatusName": {
          "type": "string"
        },
        "GlobalStatus": {
          "type": "integer"
        },
        "DisplayStatus": {
          "type": "integer"
        },
        "CalculationDateUTC": {
          "type": "string"
        },
		"Messages": {
			"type": "array",
			"items": {
				"type": "object",
				"properties": {
					"Message": {
						"type": "string"
					},
					"Level": {
						"type": "integer"
					},
					"Sublevel": {
						"type": "array",
						"items": {
							"type": "object",
							"properties": {
								"Message": {
									"type": "string"
								},
								"Level": {
									"type": "integer"
								},
								"Sublevel": {
									"type": "array",
									"items": {
										"type": "object",
										"properties": {
											"Message": {
												"type": "string"
											},
											"Level": {
												"type": "integer"
											},
											"Sublevel": {
												"type": "array"
											}
										},
										"required": [
											"Message",
											"Level",
											"Sublevel"
										]
									}
								}
							},
							"required": [
								"Message",
								"Level",
								"Sublevel"
							]
						}
					}
				},
				"required": [
					"Message",
					"Level",
					"Sublevel"
				]
			}
		}
      }
    }
  }
}
|
|---|
Choose POST as Method.
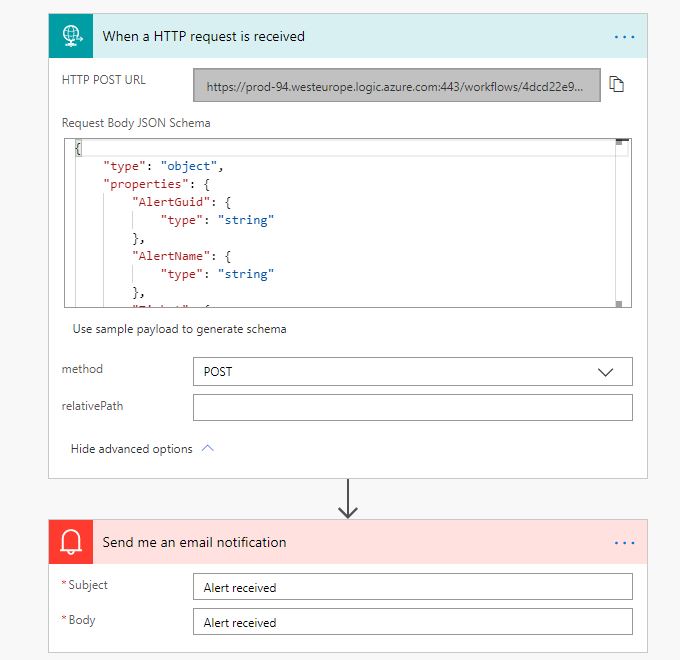
To save the flow, we must add at least one other action, so we can add a notification.
Click New step.
Choose Notifications > Send me an email notification.
Fill the Subject and the Body.
Click Save.
Click on the ‘When HTTP request is received’ task.
MS Power Automate generated a HTTP POST URL.
You have now created your first Webhook in MS Power Automate!
Next step is to configure the Delivery system in the Web Application.
Gizmo Web Application Configuration
In the panel, select the Webhook type. Then click Next.
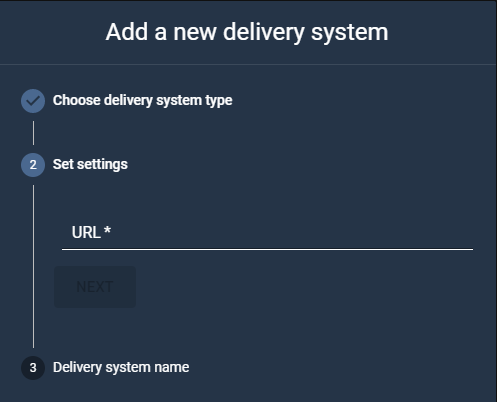
URL: Fill the URL parameter with the URL generated in the MS Power Automate 'When HTTP request is received’ task.
Name the Delivery system
Click Add.
The Delivery system is now added in the list.